
You may ask yourself why use two Internet sources at the same time, like Starlink and a cellular connection. The benefits of doing this with a channel bonding app like Speedify include getting a faster, more stable and secure Internet.
In this guide you will learn how to use your Starlink satellite Internet via Wi-Fi together with a cellular connection for better Internet.
Speedify bonds your Starlink with another Starlink, 4G/5G cellular, cable, DSL and splits traffic across them. If Starlink drops mid-call or mid-transfer, Speedify fails over to your remaining connections instantly.
NOTE: For best results, use internet connections from different sources. Joining one router over both Ethernet and Wi-Fi won't help.
Most Starlink users already run a second connection.
From a sample of 6,228 Starlink users on Speedify, 71% ran at least one other internet connection while using Starlink. Cellular is the most common choice of backup connection.
What they pair with
Increase Throughput and Lower Latency on macOS by Combining Starlink with a 4G/5G USB dongle
Should you get a backup connection for Starlink?
Yes. Starlink goes down every day — an always-on dish averages about 34 minutes of downtime daily from routine satellite handoffs. A second connection keeps you online when Starlink drops.
What’s the best backup connection for Starlink?
A 4G/5G cellular hotspot or SIM is the most practical backup for most Starlink users — it works anywhere Starlink works, requires no installation, and uses a different network so outages rarely overlap. Cable or DSL broadband is a strong option if you have it at a fixed location. A second Starlink dish is also possible if you need maximum throughput.
How do you use two internet connections at once with Starlink?
Speedify combines Starlink with any other connection — cellular, cable, Wi-Fi, or a second dish — into one bonded connection. Speedify runs on your phone, laptop, or router. When Starlink drops, Speedify moves your traffic to the backup instantly, so calls don’t cut out and downloads don’t stall. Speedify is free to try.
71% of Speedify’s Starlink users already run a second connection. Speedify’s Starlink Index tracks real-world Starlink performance data from thousands of dishes.
See the full dataset →Use Speedify to stay online during Starlink satellite handoffs every 15 seconds
Research confirms Starlink switches between satellites every 15 seconds on a fixed schedule. Each satellite handoff is a potential dropout, and on a congested network or with any obstruction, those Starlink dropouts become real interruptions.
Speedify fixes Starlink connection drops by combining your Starlink internet connection with another satellite dish, Wi-Fi, 4G/5G cellular, or wired Ethernet at the same time. When Starlink drops, Speedify keeps your traffic moving on the backup internet connection instantly.

Speedify alerts you about your Starlink dish status
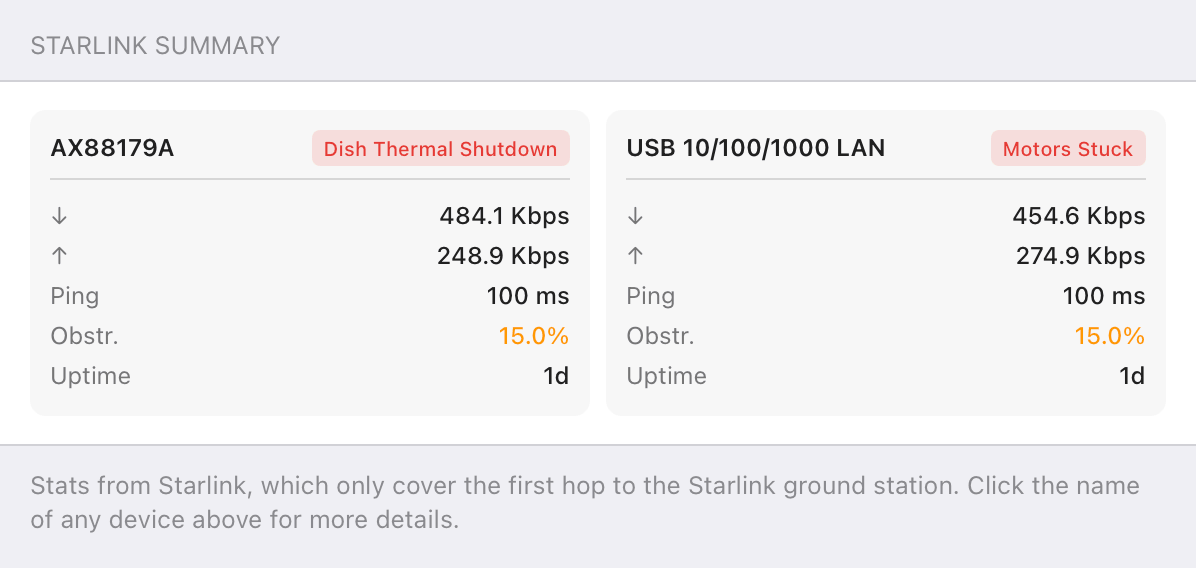
Speedify software alerts you about your Starlink dish status as soon as your dish experiences an issue - e.g. when your actuator motor is stuck, the mast is not vertical or there's a thermal throttle.
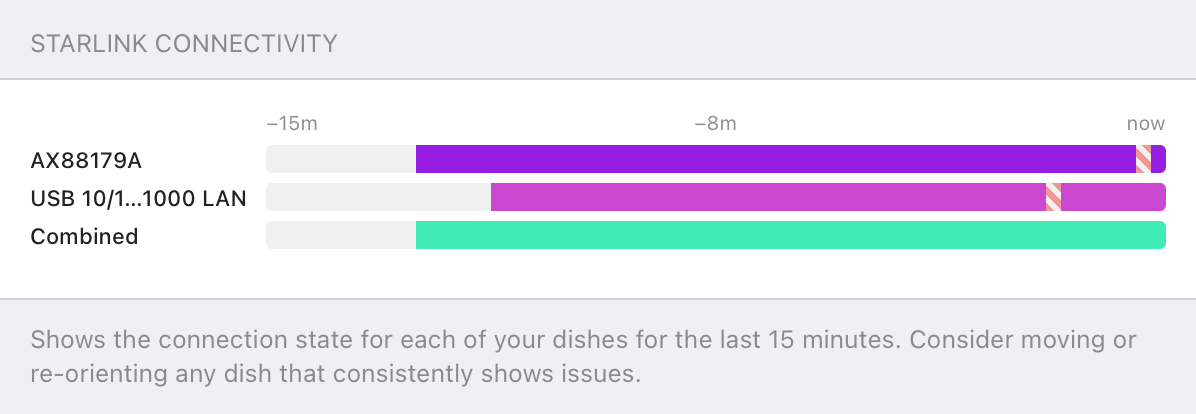
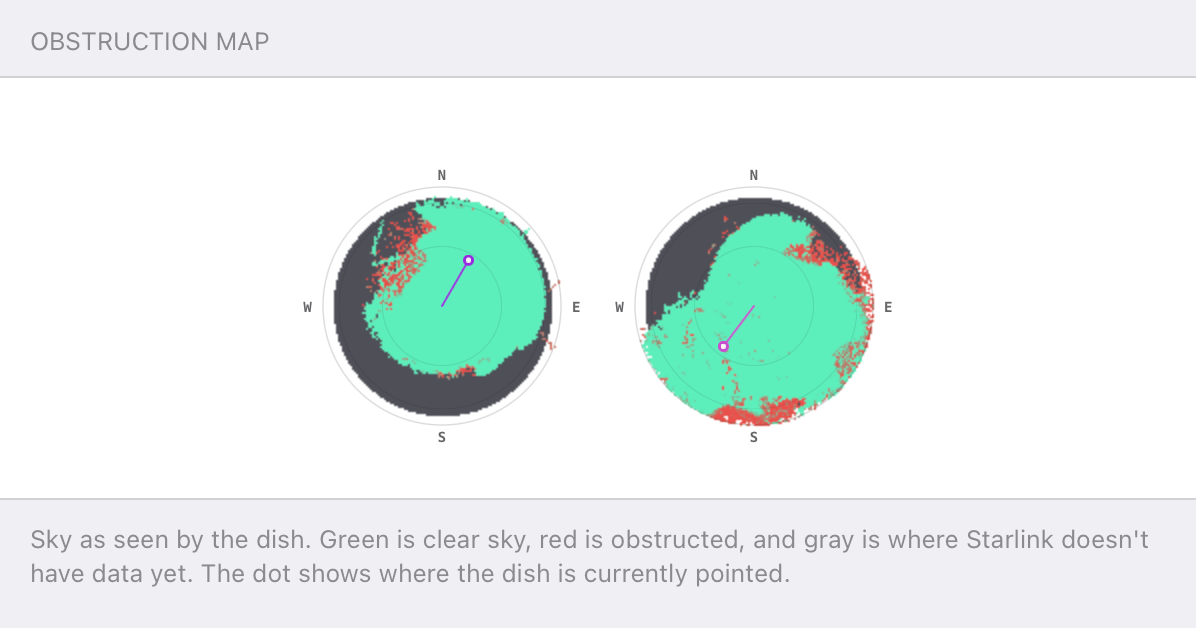
Speedify's Starlink Control Center helps you monitor all your Starlink dishes, read obstruction maps, and align multiple dishes all in the Speedify app. Get a real-time view of each dish's health and optimize the position of each Starlink dish, so you get the best possible performance out of your Starlink connections.
3 Steps to Combine Starlink Internet and a Cellular Adapter on a Mac
Step 1: Connect to Your Starlink Wi-Fi Hotspot
First - make sure you setup your Starlink according to the instructions you received in the package. This includes setting up your new Starlink Wi-Fi network, along with your password.
Click the Wi-Fi icon in the menu bar. (If Wi-Fi is off, choose "Turn Wi-Fi on.") Select the Wi-Fi hotspot associated with your Starlink connection and enter the password to connect.
Step 2: Connect the USB Cellular Adapter to Your Mac
Connect your Cellular Adapter to a USB port on your Mac. Some Cellular adapters require the use of proprietary dialer software to connect to the Internet. Be sure to follow the manufacturer's installation and operating instructions closely.
To confirm your connection status, visit System Preferences, click Network, and look for your new adapter in the list on the left.
Step 3: Download and Install Speedify
Last but certainly not least, download and install Speedify. Once running, Speedify will automatically detect your Starlink connection and any other available Internet connections and combine them for increased speed, security, and stability.
Need to keep several devices connected in areas with limited or spotty network coverage, like event venues, remote locations or when traveling? Get consistent and uninterrupted online activity for all your devices using Speedify's Pair & Share functionality, which allows you to share cellular data between multiple devices wirelessly.
By pairing devices, you can effectively distribute your cellular connection across them, improving overall performance, especially when other network options like Wi-Fi may be slow or unstable.
You can manage settings, view statistics, and even apply limits to individual connections by either clicking/tapping on them from the Dashboard or by navigating to the desired connection through the main Settings menu.
Speedify will work quietly in the background to optimize performance including prioritizing streaming web traffic to avoid stuttering, buffering and disconnects.
When using Starlink Internet, Speedify is the only VPN that makes your online experiences faster, more reliable, and more secure.
Speedify
Get started with Speedify today.
Combine Wi-Fi, 4G/5G cellular, Ethernet, Starlink, and more into one faster, steadier connection. Free to try — no credit card required.
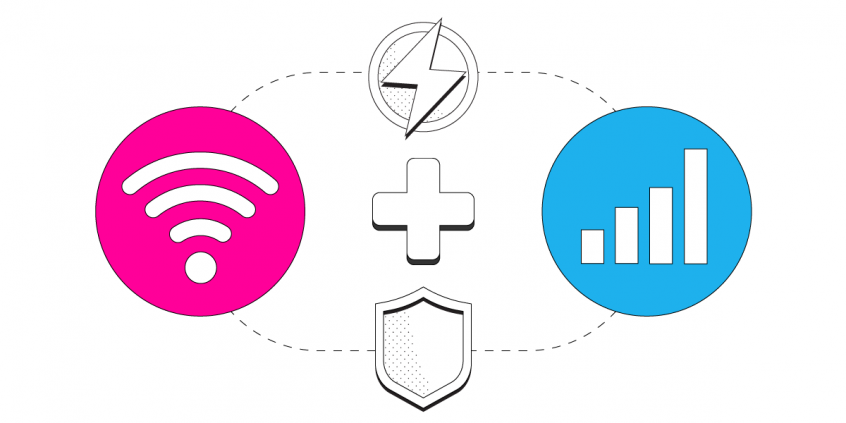
🚀 Speed
Faster uploads and downloads by bonding all your connections at once.
📶 Stability
Automatic failover in under a second when any connection drops.
🔒 Security
AES-256 encryption on every connection, on every network you join.


15M+ downloads worldwide. 75K+ five-star reviews on iOS and Android.
Alex and the Speedify team are always exploring the latest in networking and security technology—like 5G, 6G, WiFi 7, laser and satellite internet—and sharing it in new discussion content across YouTube, TikTok, Instagram, and LinkedIn every week.
Got a tech question? Let's go deeper! Pop into Speedify Office Hours live every Wednesday at 10 AM Eastern. Speedify CEO Alex Gizis and our network engineers are standing by to break down your questions about networks, tech updates, and Speedify features.